Tuesday, October 18, 2011

Curry flavoured chicken and vegetable Cous Cous


Busy busy busy... is what I have been, for the past month!
So wrapped up in work, I neglected this blog!
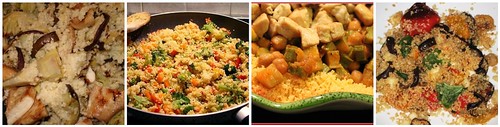
Today I want to bring you another dinner entré, which is has a first course and a side dish all in one!
I've been meaning to try my very onw cous cous recipe for some time now and was never really sure ingredients exactly to include. I've read a few recipes online and asked around. Apparently it's easier than you think. Basically, anything goes. Yep. You can put just about anything in there!

Personally, I've been craving that slight curry flavour, without overloading on the tastebds and killing everything else. So this is what I whipped up last night. Believe me... you're gonna love it!

Ingredients for 4 people:
  • 4-6 skinned, boneless chicken breast filets (not the entire breast) [depending on appetite]
  • 5-6 slices of grilled eggplant (sliced about 1cm/half and inch thick)
  • 2-3 grilled zucchine, cut in half length-wise
  • garlic to taste (or, alternatively, some onion) - you can use powedered garlic if you're out of fresh
  • curry powder, to taste
  • salt
  • olive oil
  • 300 gr medium grained pre-cooked dried cous cous. (It's the kind you find in a box, that says ready in 5 minutes!)

Directions:
Start off by oven roasting, BBQ grilling or broiling your vegetables. Be sure not to dry them out to much, but brown them enough to give them that distinct flavour and texture. (I used grilled vegetables as they were leftovers... you can of course start with fresh diced vegetables, and sautée them with olive oil and a bit of garlic, but this will of course take longer...).

Cut your chicken into thins trips and then dice them all up.
In a large sautée pan, put olive oil (to almost cover the bottom) and 1-2 cloves of garlic, and brown until golden (garlic powder will do also, if you're out of the fresh kid)

Gradually add the grilled vegetables, cutting into small bite-size pieces while the oil is sautéeing the garlic. Add salt and some curry powder. (mine is in the jar with holes in the top, so I pour it gradually... but I'd say add about 2 tsps, depending on how strong your powder is and how strong of a taste you like).

Cook until nicely flavoured and browned, about 10 mins. Now add your chicken, seasoned with some salt. If it all seems too dry, add some water. Alternatively, you can add some concentrated tomatoe paste (1-2 tsps), dissolved in some hot water. I went with plain water.
Stir nicely, mixing everything in and add more curry, about another 2-3 tsps (and salt, if necessary). Once it's ready, set aside.

Now for the cous cous. I just followed the directions on the box, which are really simple and fast.
Basically put the cous cous in a pot and add equal amounts of warm water or a bit of soup broth or stock cube (the ratio is, one glass of cous cous and equal amount of liquid, which is enough for two people. so for this recipe, double that). Add some olive oil and stir for a few seconds and then let it sit for about 5 minutes (Be sure to do this OFF the stove).
When you've returned to your pot, you'll find the cous cous has absorbed all your water.
If it seems too sticky, add a little bit more olive oil.


Serve hot, with your curry vegetables and chicken on top. Voilà!
YUM!

Monday, September 12, 2011

Time for a Roast!

This is one of my favourite meat recipes.
If you're a meat lover like I am and you like a glass of good red wine, then this recipe is right up your alley!

First off, the meat selection. The outcome of your roast will pretty much depend on the choice of meat, and for that I mean the cut. I'd say 70-80% of the results depend on the cut, in my opinion.
For a good, tender, tasty roast I'd go with Rib eye or better yet Prime Rib. Yes, it might cost a bit more, but it's SO worth the extra cost!
You can also choose Sirloin, though it tends to be a bit tough once cooked, leaving you with that "I can chew this for hours" sensation!
As a rule of thumb, any cut that has some fat in it is what you want to use. This provides the flavour and keeps the meat tender.
If you have no idea what I'm talking about, see here. Also, if you ask your local butcher or even the staff in the meat section of your local grocery store/supermarket, they will surely know what to give you. Same goes for amount/weight.

Next, the secret ingredient! No, not the wine.... but mustard! Yes, you heard me, mustard.
Please try to avoid the "squeeze out of the bottle" kind. It doesn't have to be anything fancy, but if it comes in a jar, rather than the Hellman's mustard bottle or the like, it's more likely going to have a better consitency (musn't be too runny) and flavour.

You'll also need 1 glass of dry red wine. No sweet Zinfendale or the like please... I beg you!
If you can't get Italian or French wine, then at least be sure it's dry, with a robust structure. Again, the difference is definitely noticeable. Anything such as a Cabernet, Merlot, or a Bordeaux will do great. (I'm not too familiar with what's available in the US or UK at a fair price, but I'm sure you'll do fine.. just read the label!). And for the record... NEVER chill your red wine... That's just a crime! LOL ^_^

You will also need olive oil - extra virgin. Honestly, I dunno how people can live without it LOL.
You don't need much... and now all chain stores and grocery stores carry it, you're bound to find a fairly cheap brand, even if it's imported. Many supermarkets will put their label on perfectly good imported olive oil, which cuts the cost.. just check the label to see its origin. European is best.. Italy of course, Greece, France, Spain... They sell small bottles too, most likely.
You'll need about 3-4 tablespoons, depending on the size of your roast and therefore of your pot.

So to recap, you'll need: (God I feel like I'm on one of those TV cookery shows... I can literally hear myself speaking to the audience as I type this! LOL)

*1 piece of Prime rib roast cut (or equivalent)
*1 small jar of mustard
*olive oil (3 swirls - yes, I invented that term! What that means is, that you swirl the bottle of olive oil, as you slowly pour it in your pot, circling three times... it basically needs to cover the bottom of the pot by 3/4, so not entirely)
*2-3 tsp of margarine (butter will do fine also, salted or not)
*salt

Now for the directions:
Take your meat cut and leave it in the string or netting, if it has any. Gently cover the piece with mustard, making sure to spread a thin, even layer all over. It can be a bit messy, but fun!
It doesn't have to be perfect, so long as the mustard is everywhere, on all sides. Don't worry about the meat juices watering down the mustard, it's normal.

Add the olive oil to your pot, almost covering the bottom and turn on the flame/heat. You want a nice medium-high flame, in order to get the oil nice and hot. The pot I use is stainless steel, with a thick 1/2 inch (1 1/2 cm) bottom. This helps to evenly distribute the heat and avoids your food from burning. Try to use this kind of pot, if possible.
Now add the margarine or butter to the oil and once it's melted and starting to gently sizzle, add the meat. You'll hear the meat sizzle fairly loud, don't worry, it's normal... and DON'T lower the flame/heat.


Be sure to brown all sides, in order to properly sear the meat and keep all its moisture. DO NOT add salt until your meat has browned and is seared entirely, otherwise this will cause the meat to start "juicing", expelling its natural juices, toughening the meat, giving the meat that "boiled" effect inside.

Once salted, add the glass of red wine and then lower the flame/heat some, to a medium-low setting. Not too low or the wine won't evaporate and the juices will start to flow again.
If you feel it's drying too quickly, you can cover the pot (though not entirely) for 10 minutes or longer, depending on the consistency of the juices.
Be sure to turn the roast on all sides from time to time, to cook evenly.

Once the wine and juices have nicely become Au Jus (a light, thin gravy) (about 20-30 mins or so, depending on size of roast), then it is done. Bare in mind the consitency of the Au jus is not like the typical think American or British gravy.. it is hardly even a sauce. It is more of a dark, slightly concentrated broth, almost. You are likely to see dark bits in it, that's normal. It's the mustard that has thickened, together with the natural juices from the meat.

Once finised cooking, let it cool a bit and then simply cut the string (if any) and then thinly slice the roast, and lay it on a platter or a plate topped with the Au jus, or you can serve it on the side (though I highly recommend it on top!)

The great thing about this recipe is, it can be served hot or cold (but the Au jus must always be served hot).
The ideal cook time will allow for nice pink slices, with a slightly darker (more cooked edge). This of course, varies according to taste. If you prefer your meat medium-medium well, simply cook longer (and vice versa).

I really hope you try this recipe out and let me know the outcome and what you think!
Also, feel free to comment or contact me for any questions!
Enjoy!
xox Alexandra

Friday, September 2, 2011

Classic Banana Bread

There is something that isn't made here in Italy that I simply adore.... For many in the US, it's considered a classic cake and I have searched far and wide for this recipe. Yes, i'm talking about Banana Bread!
There's something about that sweet flavour and moist texture that just has me hooked!

 After searching long and hard, several friends provided variations of the classic recipe, but for now here's I found a great basic version... and get this? No need for a mixer for this recipe!


Banana Nut Bread Recipe

Ingredients:
3 or 4 ripe bananas, smashed
1/3 cup melted butter
1 cup sugar (can easily reduce to 3/4 cup)
1 egg, beaten
1 teaspoon vanilla extract
1 teaspoon baking soda
1 cup of chopped walnuts
Pinch of salt
1 teaspoon of cinnamon
1 1/2 cups of all-purpose flour

Instructions:
Preheat the oven to 350°F (180°C). With a wooden spoon, mix butter into the mashed bananas in a large mixing bowl. Mix in the sugar, egg, and vanilla. Sprinkle the baking soda and salt over the mixture and mix in. Add the chopped walnuts. Add the flour last, and mix.
Pour mixture into a buttered 4x8 inch loaf pan. Bake for 1 hour. Leave to cool on a cooling rack. Remove from pan and slice to serve.
Ta-daaaaa! Easy as saying 1-2-3!

Tuesday, August 30, 2011

Time to get bakin'!


Alrighty!!
Enough of this idle chit-chat, let's get down to business!

A while ago I found this really interesting recipe. Bare with me now, as there is one particular ingredient that is a bit.. umm... unconventional for a cake, let's just say!

It's a Rosemary Olive Oil Cake, with chocolate chips.... and as odd as those ingredients sound, the guinee pigs.. erm I mean the "family", really liked it!
It's not too sweet and I must admit, the chocolate brought together everything really well, and really complimented the other flavours. If you're wanting to try something different, then this recipe is for you.

Rosemary Olive Oil Cake

Dry ingredients:
3/4 cup / 3 oz / 80g spelt flour (I only used the normal type, adding this amount to the amount below)
1 1/2 cups / 7.5 oz / 210 g all-purpose flour
3/4 cup / 4 oz / 115g sugar
1 1/2 teaspoons baking powder
3/4 teaspoon salt

Wet ingredients:
3 eggs
1 cup / 240 ml olive oil
3/4 cup / 180 ml whole milk
1 1/2 tablespoons fresh rosemary, finely chopped (I used the dried kind, from my spice rack)
5 ounces / 140 g bittersweet chocolate (70% cacao), chopped into 1/2-inch pieces (I used regular dark chocolate, chocolate chips)
2 tablespoons sugar, for top crunch

Preheat the oven to 350F / 175C. Rub a 9 1/2-inch (24 cm) fluted tart pan (aka pie dish) with olive oil. Alternately, you can use a loaf pan., like I did.
You can line it with parchment paper. I just used some olive oil.

Sift the dry ingredients into a large bowl, (the recipes says to pour any bits of grain or other ingredients left in the sifter back into the bowl). Set this first mix aside.

In another large bowl, whisk the eggs thoroughly. Add the olive oil, milk and rosemary and whisk again. Using a spatula, fold the wet ingredients into the dry, gently mixing just until combined. Stir in 2/3 of the chocolate. Pour the batter into the pan, spreading it evenly and smoothing the top. Sprinkle with the remaining chocolate and run a fork along the length of the chocolate so that the batter envelops it just a bit. Sprinkle with the remaining sugar.

Bake for about 40 minutes, or until the top is domed, golden brown, and a skewer inserted into the center comes out clean. My cake, in the alternate pan, took closer to 55 minutes.

Enjoy!

Welcome!

I figured there's not much point in baking yummy goods and  cooking great meals if you can't share the efforts of your hard work with anyone.. and this doesn't just mean with the friends and family that are (un)fortunate enough to taste the product of my cooking skill!
This of course means you readers out there who maybe, like me, are passionate about what you eat and enjoy dabbling in the kitchen, while others of you might be seeking new fun things to try out or simply have no clue what you're doing and just use your kitchen cabinets for storage space!

What ever the reason, I'm pretty sure that there's nothing more exciting about trying a dish cooked with your own hands.
I won't promise nouvelle cuisine or high end catering products. I'm pretty much bringing to this blog, what I bring to my table... plain simple recipes that any working girl like me can easily reproduce, in a time-effective manner.
Being Italian, you're going to find lots of typical Italian dishes, cooked the real Italian way, with authentic Italian ingredients and Italian know-hows, tips and tricks. I do, however, adore American baking, (as my first love is and reamins cupcakes) and desserts from various types of cuisine. It's interesting to compare different cooking techniques and ingredients.

I won't tell you that my recipes are fool proof, nor that they're all mine.
Many come from my mother's kitchen, many come from cookbooks or the internet, while others come from friends, but every time you take a recipe and "make" it, in some way it becomes your own. Adding something extra here, or replacing some ingredient there makes a recipe become yours in some way, and sharing that with someone is like spreading love around. There's nothing better than a loving relationship... and having a loving relationship with food is what this blog is all about!
Related Posts Plugin for WordPress, Blogger...